And since you are not even using the said Windows service, getting high CPU usage from it can be quite frustrating. One such common issue found in Windows is the System Interrupts 100% CPU high usage, affecting the performance of all other applications on your computer. Hence, we are here with a complete tutorial on fixing the system interrupts causing the high CPU usage issue. You can also learn about the system interrupts 100% CPU usage issue by going through this tutorial till the end.
What is the System Interrupts Issue?
Before we go ahead and take a deeper look at the possible fixes for the system interrupts 100% CPU usage issue, let’s learn a bit more about the system interrupts service and the issue caused by it. System interrupts is an inbuilt Windows service running in the background at all times in most computers. It is designed to check the CPU interrupts caused by other background programs and services on your computer, which happen on a lower system level. Even though this Windows service is essential for detecting CPU errors and interrupts, it can also cause high CPU usage on its own in some cases.
How to Fix the System Interrupts causing High CPU Usage Issue?
After learning more about the system interrupts Windows service, it is quite evident that the service itself is quite important for your computer to perform properly. But if this service is causing high CPU usage on your computer, fixing it is highly important as well. Because of this, we are here with an extensive guide on how to fix the system interrupts 100% CPU usage issue. For the same, you can simply go through the following fixes and solutions for getting rid of the system interrupts high CPU usage issues:
1. Remove/Disable your External Devices
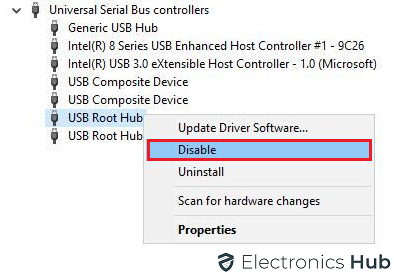
In most cases, the external devices connected to your computer send various signals and inputs to the CPU of your computer. Because of this, your computer’s processor can get overwhelmed and even possibly get high CPU usage issues from the system that interrupts Windows service itself. Thus, you can try removing or disabling all your external devices one by one. If you are not able to remove a certain external device due to some reason, you can disable it from the Device Manager as shown here:
You have to first press Windows Key + X on your keyboard and select Device Manager from the list. Once you are inside Device Manager, expand the Universal Serial Bus controllers list to see all your external devices. Now, one by one, right-click on all of these external devices and select Disable, which will stop all inputs from them, possibly fixing the system interrupting 100% CPU usage.
2. Check all Hardware Drivers
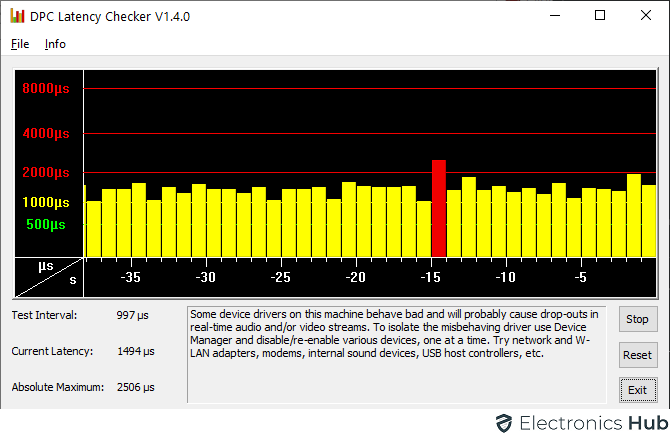
As you would know, each and every hardware device connected to your computer has a driver. This driver is there to handle all the inputs and signals coming from your hardware devices which are meant to be sent to the CPU of your computer. But if the hardware driver itself is corrupted or outdated, it might not be working properly and causing issues like high CPU usage caused due to system interrupts. Thankfully, you do not have to manually check each and every hardware driver installed on your computer. Instead, you can simply install a program called DPC Latency Checker which will show you the latency of each hardware driver. And if you see abnormal latencies for any hardware drivers, you can simply update them from Device Manager quite easily.
3. Disable your Internal Devices
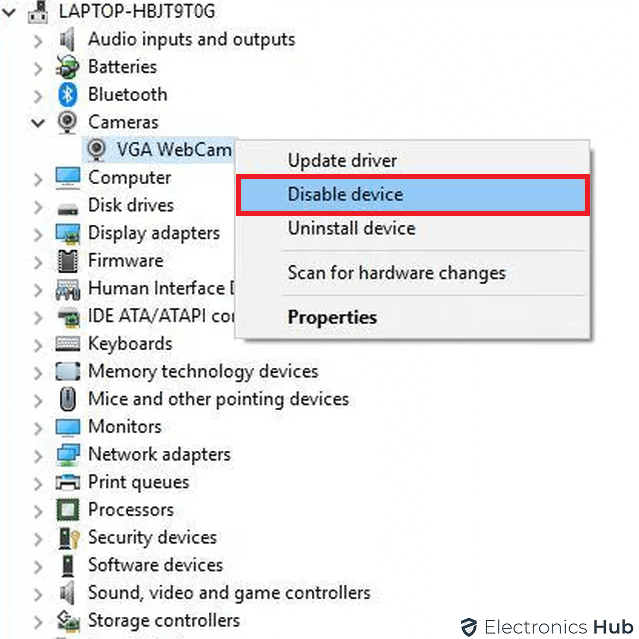
Other than the external devices connected to your computer, its internal devices and components can also cause issues related to the CPU. Similar to external devices, this is also caused due to the various inputs and signals sent by these devices to your CPU. And as seen with external devices, you can easily disable internal devices from the Device Manager as shown earlier. Coming to the internal devices which you need to disable, which can be possibly causing the system interrupts 100% CPU usage, it can include the following internal devices:
Network adapters and network cards Internal modems Sound devices and sound cards Add on expansion cards like TV tuner, DSL adapters, etc.
While disabling the internal devices of your computer, make sure that you are not disabling devices like the processor, memory, graphics card, and others. This is due to the reason that any of these are disabled, your computer may not function properly.
4. Exclude all the Failing Hardware
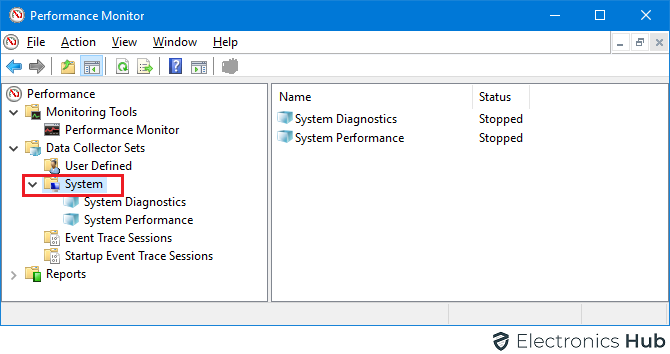
If you are using an old laptop or desktop, then it is highly likely that its internal components are not working properly anymore. And similar to corrupted external devices, such old and failing hardware can also cause the system to interrupt high CPU usage issue on your Windows PC. Fortunately, you can easily check if any of your computer hardware is failing or not by using a Windows utility called Performance Monitor as shown here:
Use the Windows Search feature to open up the Performance Monitor on your computer. Here, go to Performance Monitor under the Performance and Monitoring Tools tab. Here, you can see a graph of every hardware component of your computer and check if any of them are failing or not working properly.
5. Try Disabling Sound Effects
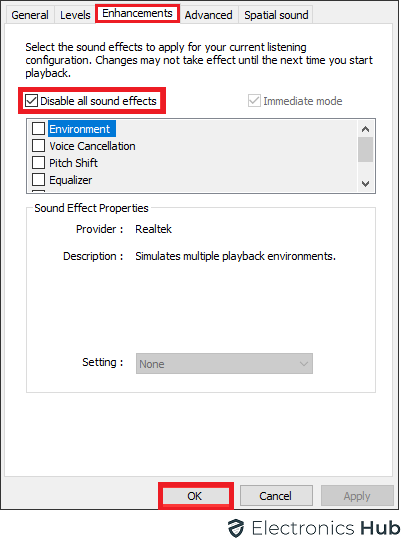
Irrespective of the Windows version that you are using, it will have a large number of sound effects in it. These sound effects are played according to the actions you are performing and the issues your computer is facing. While these sound effects are highly important for a complete and immersive computing experience, they can also cause issues related to your CPU in some cases. Thus, try disabling all sound effects on your PC as shown here if you are facing the system interrupts 100% CPU usage issue:
You have to first right-click on the speaker icon in the bottom right corner of your screen and open the Sounds/Playback Devices menu. Now, right-click on the default speaker device of your computer and open its properties. Here, head over to the Enhancements tab and select the Disable all enhancements option which should fix high CPU usage caused due to system interrupts.
6. Update the BIOS to the Latest Version
Similar to Windows or any other program installed on your computer, the BIOS of your computer can also have different versions thanks to regular updates released by your computer manufacturer. Such BIOS updates are meant to fix any possible bugs or issues related to your PC including the system interrupts high CPU usage issue. Thus, you can go to the website of your computer manufacturer and look for any available BIOS updates under their Support or Downloads section. If there is any update available, download and install it as per the instructions given on the computer manufacturer’s website.
Conclusion
Whether you have a highly powerful CPU or an entry-level one, making sure that it does not have high CPU usage in the background is highly important. This is to ensure that you are getting the most out of your computer processor and you are not facing any lag issues due to high CPU usage. Since high CPU usage is mostly caused due to background Windows services like system interrupts, we have given a complete guide on how to fix the system interrupts causing high CPU usage issue up above. Along with this guide, you can find various possible fixes as well as complete details of the system interrupts issue. If you have gone through all the information regarding the system interrupts 100% CPU usage issue given above, make sure to share your thoughts in the comments section. You can also post any questions down there if you have any! Comment * Name * Email * Website
Δ




![]()