One of the greatest advantages of a table saw is that, unlike other cutting operations where the workpiece is stationary, the tool itself is stationary in this scenario. Considering wood is lightweight and easily maneuverable compared to other workpieces like metal and sheet metal, it is very easy to use a table saw. In case you do not have any previous experience with a table saw, we have prepared a guide for you where we will discuss how to use a table saw in detail. We will study different parts of a table saw, working procedure, maintenance requirement, and safety tips as we go through the guide. Hence, make sure you read the article fully so that you don’t miss out on an important topic.
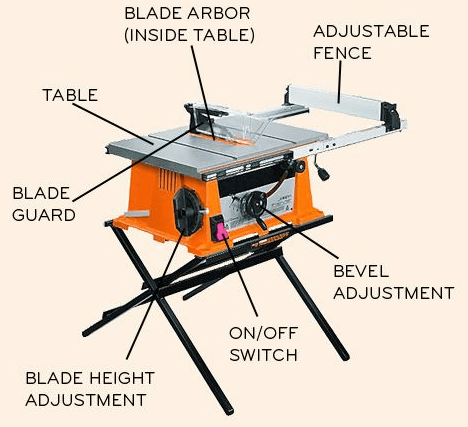
Parts of a Table Saw
Before we move onto the working of a table saw, we should thoroughly understand the main parts of a table saw, and their functions in working the table saw. Before you can get started on a table saw, you need to carefully examine the following parts and make sure they are in perfect condition to avoid any mishap. A proper operation of the table saw requires proper maintenance of the following parts:
1. Table
The table provides rigid support for the operation of the table saw. It usually consists of rigid legs and heavy dead weight so that the table saw stays stable and safe from external vibrations and shocks.
2. Fence
The fence is usually a wooden log that acts as a guide installed parallel to the blade itself. With the fence, you can keep your workpiece at a constant distance from the blade while providing the cut.
3. Fence Dog
The fence is adjustable as you might need some additional space on the table while working with a large workpiece. Thus, there is an adjustment level provided for the fence called “fence dog”. Once you lift this lever, you can easily move the fence and lock it by pressing down the lever.
4. Blade
This is the most important part of the table saw as it generates the cut on the workpiece. There are many different types of blades available for a table saw, such as flat-top grind, alternate top bevel, combination blade, triple chip grind, etc. You should carefully check the type of blade installed on your table saw and make sure it is the proper option for your workpiece.
5. Height Adjustment Wheel
This is an adjustment wheel that is provided to allow adjustment on the height of the cutting wheel. By changing this height, you can manage the depth of cut generated on the workpiece. Make sure that this wheel is in proper condition before operating the table saw.
6. Angle Adjustment Lever
As the name suggests, the angle adjustment lever is provided to adjust the angle of the cutting blade. You can adjust the angle to create certain angled cuts on the workpiece, which is not possible on standard table saws without angle adjustment levers.
7. Power Switch
The power switch is the main switch of the table saw which turns on/off the machine. Before you start working on the machine, make sure that this switch is perfectly operational and can be pressed to instantly cut off the power at any point in the operation.
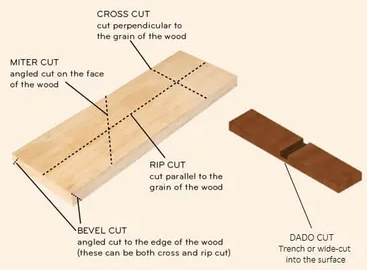
Types of Cuts
Due to the adjustment options available on a table saw, you can manage multiple different types of cuts on the table saw. There are mainly three types of cuts that can be performed on a table saw which are as follows.
1. Cross Cut
The cross-cut is one of the simplest cuts possible with the help of a table saw. The cross-cut is simply a cut made across the grain of the workpiece. The cross-cut can also be made around the narrow section of the board easily. To generate a cross-cut, you will need a miter gauge or the cross-cut sled on your table saw.
2. Ripping Cut
The ripping cut is basically a very long cut which usually requires you to utilize the whole table to slide the workpiece over the blade. To ensure proper accuracy in ripping cuts, you will need to use the fence as a guide for your cut. You can also adjust the position of the fence to further improve your accuracy.
3. Dado Cut
Dado cuts are special types of cuts made on workpieces that are required to join two different workpieces together. You will also require a miter gauge or the fence for dado cuts. But, it will be better to obtain special types of blades that are specifically designed to generate dado cuts for better results.
How To Use A Table Saw?
Now that you are familiar with the parts of a table saw and the different types of cuts you can make, let’s go over the procedure of making the cut by using a table saw. In the following section, we will cover some safety measures that are necessary before and while making the cut, along with steps to create ripping cuts and cross-cuts. After going through the following steps, you will be able to efficiently handle a table saw without any problem.
Staying Safe
Safety should be your first priority while working with automatic power tools such as a table saw. Even a little distraction can cause fatal accidents, which must be avoided at all times. Thus, you will need to ensure the following safety protocols are being followed before you get started on a table saw.
Ripping Boards
If you are generating ripping cuts on a board, you will have to follow the steps provided below.
Making a Cross-cut
If you are generating cross-cuts on a board, you will have to follow the steps provided below.
Maintenance
Every machine requires maintenance so that its external as well as internal parts have a long lifespan and do not fail while operational. A table saw also requires general maintenance, which can be carried out by following a few guidelines that we are providing here.
Dos and Don’ts
While using a table saw, there are a few things that you should do and some things that you must avoid at any cost. The following dos and don’ts will provide you a clear guideline on how to use a table saw and also help you by giving you a few tips on what to perform and what to avoid while using a table saw.
Do
Don’t
Now that you are confident about how to use a table saw, you can start working on your DIY project, or professional table saw job right away. If you are unsure a
Conclusion
bout a certain step or point mentioned in this guide, you can clear your doubts by raising a query in the comment section. You can also ask us about any additional information that you might need before using a table saw. Comment * Name * Email * Website
Δ
![]()
![]()
![]()
![]()
![]()

