But, the recent launch of iOS 11 has made things easier for iPad users. This OS enables the users to record their screens without going through any trouble. If you have an older device, you may need to resort to other plans. But, do not worry, we have you covered here. Even if your iPad runs on an older iOS version, you can also capture screen recording. Here is the detailed guide on how to capture screen records on your iPad easily-
How to Record an iPad Screen
Record Directly through Your Ipad (Ios 11)
If you have an iPad that runs with iOS 11, the task becomes more accessible than ever. You can record the screen using the following steps-
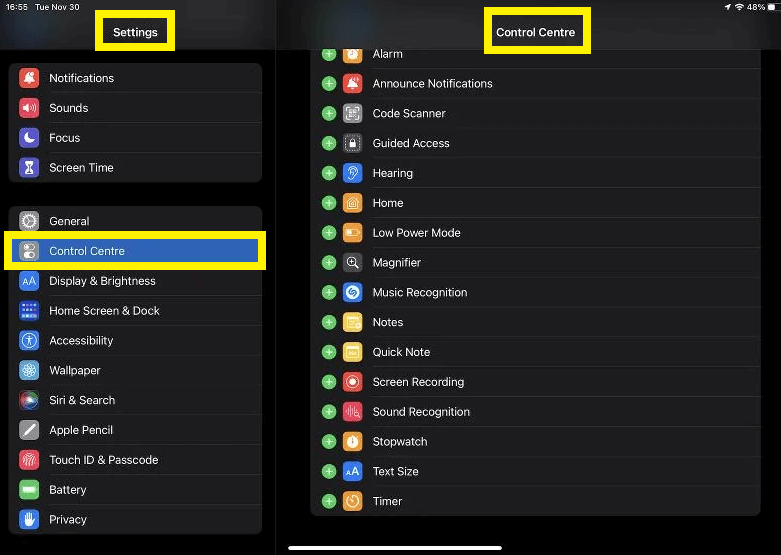
First, open the Settings tab on your device. Now, navigate to the Control Centre through the drop-down
From here, go to Customize Controls. Here you will find a drop-down menu. Go down to find the Screen Recording It will have a “+” icon. Click on it.
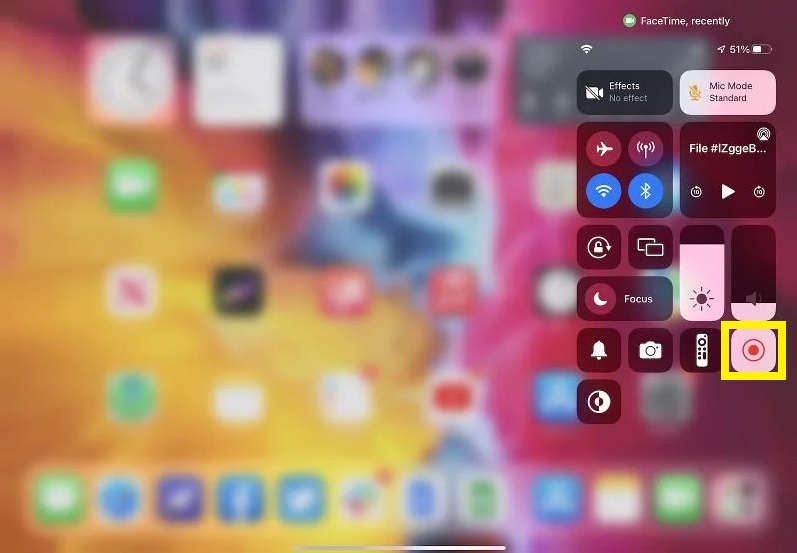
From here, open the Control Centre and select the recording Click on it. Your screen will display a countdown timer of three seconds. After three seconds, the screen recording will start automatically.
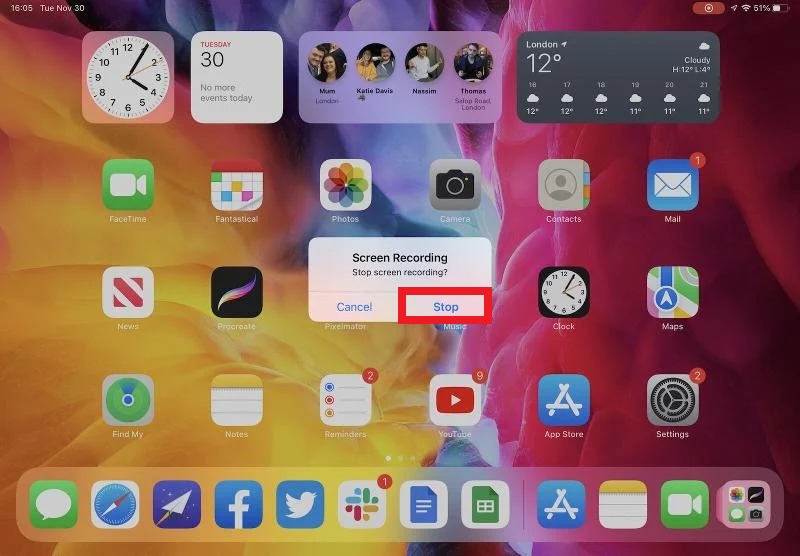
If you want to stop the recording, tap on the red status bar of your screen. Alternatively, you can again open the Control Center and click on the red button to stop the recording.
1. Quicktime Player
The Quickplay Timer is an exclusive feature of iOS 8 and OS X Yosemite. So if your device supports these two OS, you can use QuickTime player for recording your iPad screen. You just need to have a lightning cable handy. Here is a step by step method-
First, connect your iPad with your Mac device through the Lightning Now, open QuickTime Player. From here, open the File A new drop-down menu box will open on your Click on New Movie Recording You will find a new recording window has appeared on your First, click on the arrow beside the stop/resume button. Then, click on the iPad to start recording. Click on the Record button to start recording your device screen. Click on the stop button and save the video when you want to stop. If you want to trim the screen recording video, you can press Cmd+T before saving it.
2. Screenflow
Screenflow is another practical application to record screens on any iPad. It also allows you to edit the video inside its own editing platform. The video quality of ScreenFlow is pretty impressive with its high-end graphics quality. The best part? You can use ScreenFlow without spending money! Follow this guide to record the screen using Screenflow to start recording your device screen.
First, connect your iPad with your mac device through the OTG cable. Your mac will instant;y detect the device and give you an option to record the screen. You will find Record Screen from the box on your Select the device that you want to use for screen recording. If you want to record the audio besides the video, click on Record Audio From Box and select your device name for audio recording. You can click on the start button to start the screen recording. After the record is complete, Screenflow will open its editing platform, where you can trim the video or edit it as per your preference before saving it for future
3. El Gato
El Gato was a popular app before Apple introduced its QuickTime player. As a result, you will find many iPad users still have this app on their devices. ElGato has a cult following among gamers, and you can use the El Gato game capture device to record your iPad screen. Here is a step by step guide for you-
First, connect your iPad with your El Gato game capture device with an HDMI If you do not have that, any Apple Digital AV Adapter will be helpful. Next, add the gaming hardware to your PC. The PC will be used to initiate the recording procedure. A new screen will open on your Here you can select the video quality resolution of either 1080n or 720 as per your preference. You can select the video format as the deflection format or secure format for saving it. Now, click on to start recording. But, of course, you can also stop the video whenever you want. El Gato also offers an editing platform to trim or jump the video as per your From here, you can send the video to iTunes or save it inside your iPad as per your preference.
4. Reflector
The Reflector app also has a decent base for people who want to record the screen of their iPad. It is a paid app and comes against a charge of $14.99. You can use the Reflector app to record your device’s screen and save it on your computer as well. It has wireless technology, and you just need your PC(with a PC or Mac version of the Reflector app) and your iPad for screen recording. It allows you to record the screen at 60fps speed and add frames to your record. Additionally, you can also record multiple iPad’s screens at once through this app.
How to Record an iPad Screen Via Voiceover
iPads do not record the audio while recording the screen. It happens because the microphone of your device is in mute mode. So, if you want to add voiceover to the screen recording or want to add the audio, here is a detailed method for you-
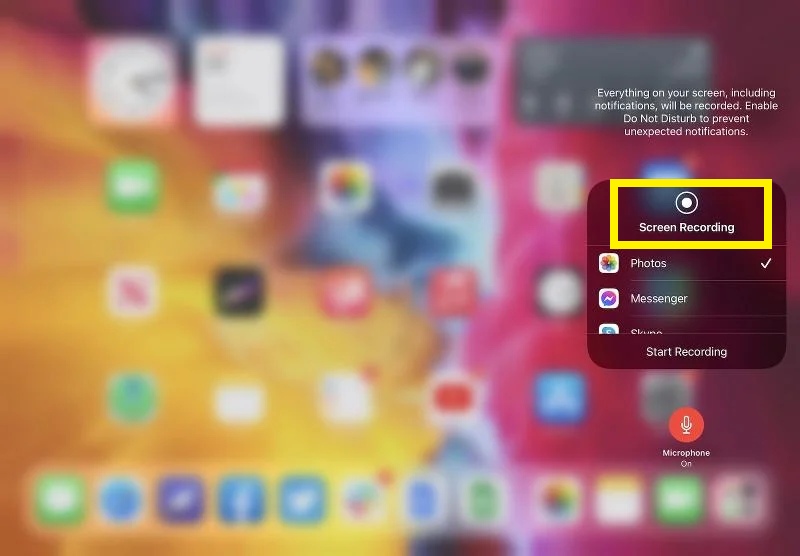
Open the Control Centre of your device Next, long-press the toggle button in the control center. Here, you will find the microphone icon beneath the Start recording If the microphone is off, turn it on by tapping on it. Finally, tap on start recording to start the screen recording.
Why Should you Record your Screen?
But, why do you need to record your screen? Well, this feature is a versatile feature that works for many things. Here are the possible causes that require screen recording
You need to demonstrate a procedure for the iPad.
If you are an expert iPad user, people may ask you to demonstrate many procedures like capturing a photo, changing settings, or other functions. In such cases, recording your device’s screen while you perform the asked tasks wonderfully. The screen recording here serves as a tutorial for those who may need help from you. The video demonstration looks real and ensures the other person gets the whole procedure in one go.
You need to report an error or bug.
Using applications often comes with an encounter with a programming bug or a recurring error. In such cases, you need to submit proof to support your opinion. Here, a screen recording with the mention of the error or bug is ideal as it offers in-depth information about what is wrong with a particular application.
You are reviewing an app or platform.
Reviews become excellent with videos. So, many people often prefer to record their screen for reviewing a newly launched game or app for iPad.
You want to record your gameplay.
If you are an avid gamer, you may love to record your gameplay sessions for streaming or future purpose. In such cases, recording your iPad screen is the best idea to show off your gaming skills. You can also upload the recorded video on social media to save it for your future reference.
Conclusion
Overall, recording an iPad screen is no longer a daunting task. If you have a new iOS 11 or the latest version, you will have a different screen recording feature. If you use an older iPad model, there are plenty of apps from Apple or other developers that allow you to record the screen as per your preference. Comment * Name * Email * Website
Δ
![]()
![]()
![]()
![]()
![]()

