No matter which version of Windows you are using, you may face the issue that the computer won’t shut down. However, the solution to the problem differs for different versions of Windows. In this article, we will provide you with all the methods and solutions to fix the computer won’t shut down issue.
5 Procedures to Solve Computer Won’t Shut Down in Win 7/8/10
Method 1: Close Open Programs
Running programs and other files can make your computer take forever to shut down. For this, you will have to make sure that you close all the open programs. Always save the data and then shut down your computer. In some cases, your system will close automatically and save the data. To close the open programs, you can follow the necessary steps.
On the screen, you will come across the option of Force shutdown and Cancel. You will have to select cancel. In the next step, you need to go to the program which shows errors. Follow by saving the necessary file and proceed to shut the system. If in any case, the system shows the same error, you can select the force stop option.
Method 2: Update Drivers and Windows
When the device driver is out of date, you will have the same problem. It is important to update the driver and solve your problem. However, do keep in mind that it requires patience as well as skills. You can update the drivers in the following way.
Download Driver Easy and install it in your system. You will have to run Driver Easy and click on the button of scan now. It will scan your system and find out if there are any problems. The next step will be to select Update All. It will automatically download or install the correct version of the driver. You can confirm it by checking if your computer shuts down normally.
Alternatively, you can update it by clicking on Start and then Settings.
Select from the option of Update & Security.
The next step will be to check for updates. If there is any new update, you can select from install updates. Do keep in mind that you need to restart the computer once the installation is complete.
Method 3: Change Power Settings
Even when there is a problem in power settings, your system will not shut normally. To make sure that your shutdown process is smooth, you need to do the following process.
Click on Start and select the Power Options.
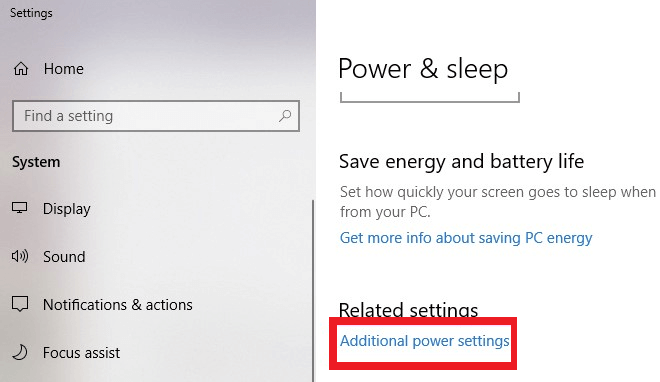
Click on Additional power settings
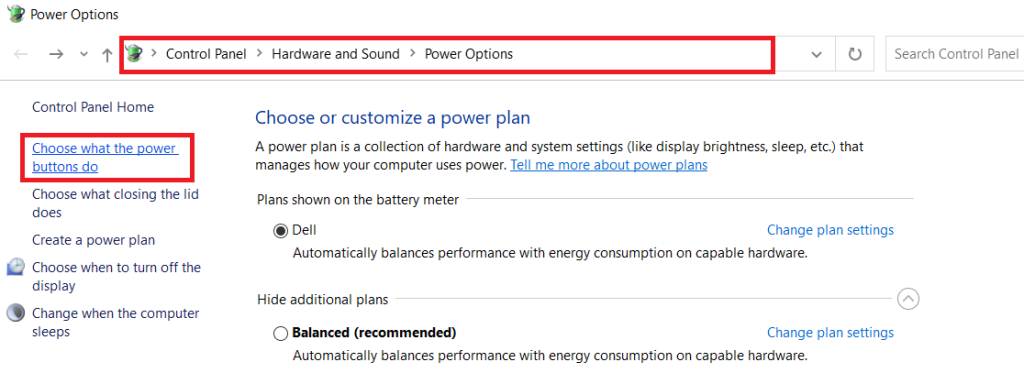
You will now land on the next page from where you need to choose ‘Choose what the power button does.’
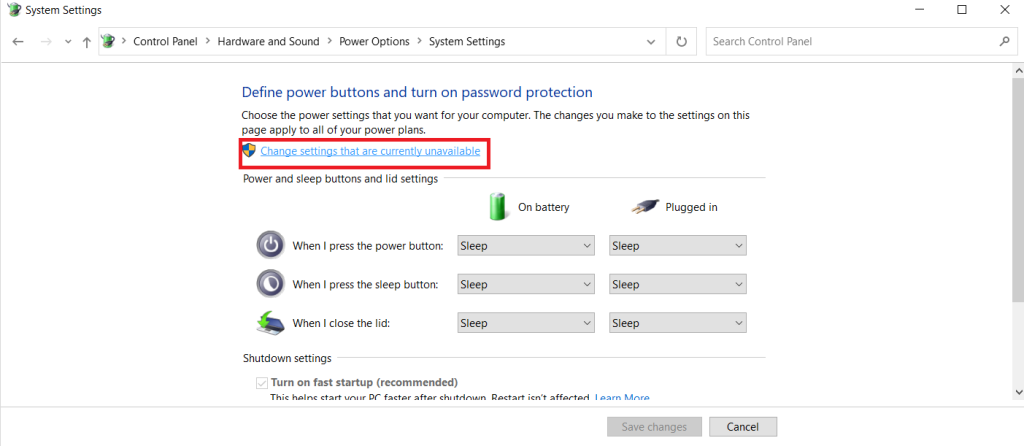
You will come across multiple options from where you need to choose ‘Change settings that are currently unavailable‘.
The final step will be to save the settings by clicking on OK.
However, it is important to note that the fast start-up feature is available only on Windows 10.
Method 4: Disable Clear Pagefile at Shutdown
In some cases, the page size may also disrupt the normal shutdown process. You will have to know that when there is an overflow of RAM, it can lead to a problem. For this, it is important to disable the clear page file before shutdown. You can do it in the following way.
Click on the option of My Computer and type “regedit.exe”. Once you click OK, it will run the command. This will navigate you to the directory HKEY_LOCAL_MACHINE\SYSTEM\CurrentControlSet\Control\Session Manager\Memory Management. The next step will be to locate ClearPageFileAtShutdown. You can click on the option of Modify and change the value.
Method 5: Repair Corrupt Hard Drive
There can be problems in shutting down your system if there is any corrupt hard drive. It is important to repair the corrupt hard drive that will help to fix the disk errors.
The first thing that you need to do is to press the Windows and ‘R’ at the same time. You will get an option where you need to input the ‘cmd’ option and then click OK. Follow it but typing “SFC/scan now” and press Enter.
Now you need to wait until the verification is complete. In the next step, you will have to reboot the computer and confirm if the problem still exists.
You can even repair a corrupt hard drive via My Computer.
For this, you need to right-click on the system drive. You will come across many options from where you need to select Tools and then Error-checking. Your system Error-check and repair if there are any errors.
5 Ways to Solve Computer Won’t Shut Down in Windows 10
Solution 1: Turn Off Fast Startup Feature
The feature of Fast Startup is associated with the boot-up process of the computer. It can be one of the reasons for Windows 10 that may not lead your computer to shut down.
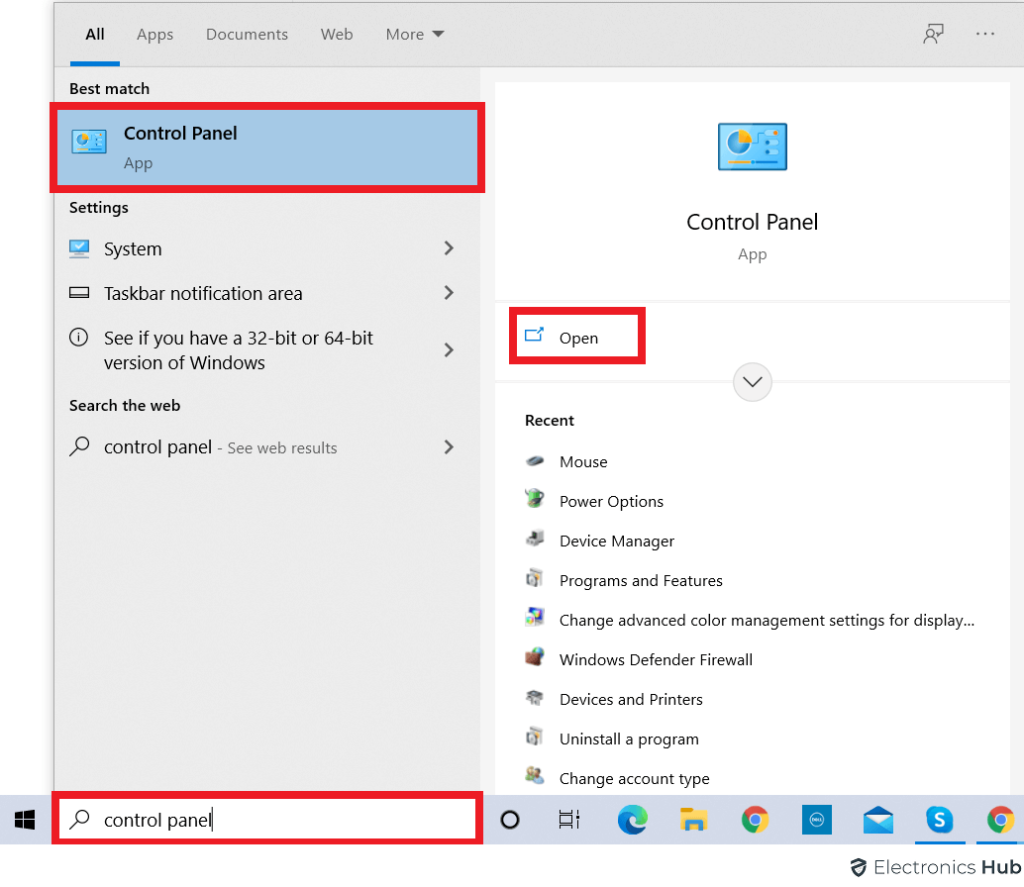
You need to launch the control panel.
Choose the Power Options and
then select the option of ‘Choose what the power button do‘.
All you have to do is to untick the option of ‘Turn on fast startup (recommended). Click the ‘Save changes‘ option and try to shut down your computer.
Alternatively, you need to click on Start and then select settings.
Select ‘System and click on the option of ‘power & sleep’. In there, you will find the option of ‘Additional power settings’. You will now have to click on Choose what power button does. Select ‘change setting that is currently unavailable’. Make sure that you uncheck on Turn on fast startup option. Save the changes and try to shut down your system.
Solution 2: Update Your Device Driver
Outdated device drivers can lead to many problems. It can even make a computer slow down and it can crash. Updating of the device driver is done manually or automatically. Here are the steps to update the device driver.
Press the Windows key + X together and you will come across Quick Access. You will now have to select Device manager which will display multiple options.
From there, you need to select the option of Update Driver.
Your system will automatically search for updated driver software. If there is any update, it will be installed automatically.
Solution 3: Change Boot Order in BIOS
Changing the boot order on BIOS is actually performing a full shutdown. Keep in mind that the boot can control the drive of the computer. You may face problems during shutdown and startup if the hard disk is not the primary device. To prevent this, you need to change the boot order in BIOS.
You can do it by entering the BIOS startup and press the ‘Del’ key. You will come across a new page wherein you will have to choose the Boot tab. You need to choose HDD and then press F10 for making any changes. Exit from the page and try to shut down the system.
Solution 4: Uninstall Anti-Malware
You will have to remove any anti-malware or anti-virus program. Third-party software can make various errors including restarts and shutdowns. You can uninstall the software by
Selecting Windows and ‘R’ keys to launch Run You need to type “MSConfig” and select OK. Now you will come across the configuration window from where you need to select Services. Always select ‘Hide all Microsoft Services Checkbox’. Finally, you need to select OK and reboot your computer.
Solution 5: Use Windows Update
Even updating the Windows can help resolve the problem of the shutdown. It can even help to prevent other errors.
You need to go to Control Panel and select Troubleshooting. From there, you will have to select System & Security. The next option will be to click on ‘Fix problems with Windows Update‘. Now click on ‘Trouble Shoot as an Administrator‘. You will have to fix any problems by following the necessary instructions.
Conclusion
You will try out one method after the other because you never know which one will be suitable for your Windows. You should be patient and follow every step minutely in order to solve the issue. If nothing works for your computer, you need to get the help of a professional. Comment * Name * Email * Website
Δ


![]()