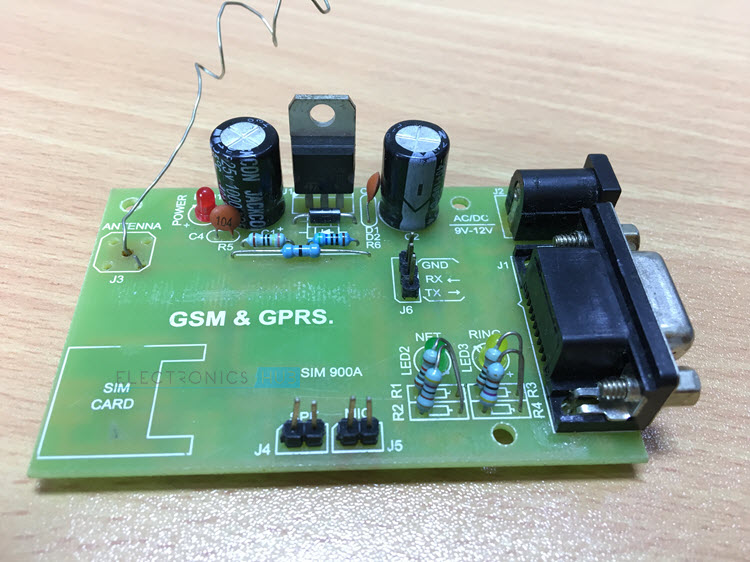
A GSM GPRS MODEM comprises of a GSM GPRS Module along with some other components like communication interface (like Serial Communication – RS-232), power supply and some indicators. With the help of this communication interface, we can connect the GSM GPRS Module on the GSM GPRS MODEM with an external computer (or a microcontroller). GSM / GPRS Modules allow microcontrollers to have a wireless communication with other devices and instruments. Such wireless connectivity of microcontroller opens up to wide range of applications like Home Automation, Home Security Systems, Disaster Management, Medical Assistance, Vehicle Tracking, Online Banking, E – Commerce etc. to name some. Before going in to the details about the GSM/GPRS Module, we will first see a few basic things like GSM, GPRS, MODEM, Module and System. Also read HOW TO INTERFACE GSM/GPRS MODULE WITH 8051?
What is GSM?
GSM or Global System for Mobile Communication is a Wireless Communication standard for mobile telephone systems. It was developed by the European Telecommunications Standards Institute (ETSI) as a replacement to the 1st Generation Analog Cellular Network. Hence, GSM is often called as the 2nd Generation Digital Cellular Network or simply 2G. From its deployment in Finland in the year 1991, GSM has grown rapidly with an estimated market share of over 90% in more than 200 countries.
What is GPRS?
GPRS or General Packet Radio Service is an extension of the GSM Network. GPRS is an integrated part of the GSM Network which provides an efficient way to transfer data with the same resources as GSM Network. Originally, the data services (like internet, multimedia messaging etc.) in the GSM Network used a circuit – switched connection. In this type, the access time for the network are long and the charges for the data were based on the connection time. Also, this type of connection is not suitable for transmitting bursts of data. With the integration of GPRS, a packet – switching based data service, in to the GSM Network, the scene of data services has changes. In GPRS based packet – switching networks, the user device doesn’t hold the resources for a continuous time but efficiently uses a common pool. The access time in GPRS is very small and the main advantage is that it allows bursts of data to be transmitted. Also, the charges for data are based on the usage and not on the connection time.
Difference between a Module, MODEM and Mobile (System)
A GSM/GPRS Module is a device or chip that is actually responsible for the wireless communication with the GSM Network. A GSM/GPRS MODEM is device that modulates and demodulates the signals from the Wireless Network and allows internet connectivity. A GSM MODEM generally consists of a GSM Module along with some other components like a SIM Card, a device to modulate and demodulate the signals and power supply. A System, like a mobile phone for example, is a complete device that has a GSM Module (might be integrated in the processor), a GSM MODEM (even this might be integrated) and other components like processor, screen, keypad, speakers, microphone etc. Check out this interesting post on Differences between GSM and CDMA. Speaking of GSM/GPRS MODEMS, they are a class of Wireless MODEMS, which use the GSM/GPRS Network for transmitting and receiving data. Wireless MODEMS are also available for different cellular networks like CDMA, GSM, UMTS and LTE and different data services like GPRS, EDGE, HSDPA and LTE.
GSM/GPRS Module
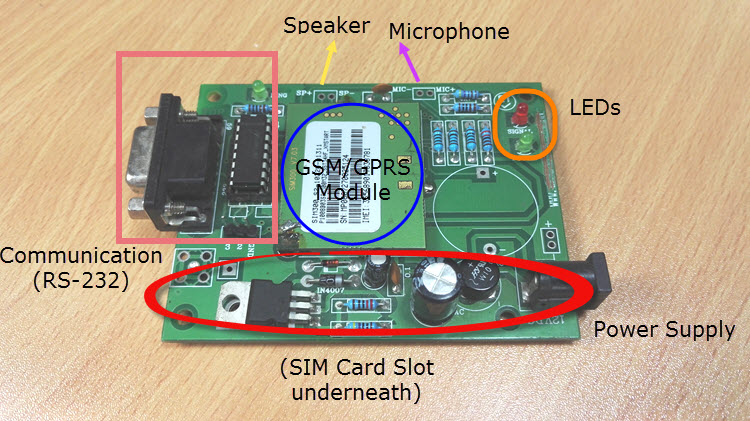
A GSM/GPRS Module is an IC or chip that connects to the GSM Network using a SIM (Subscriber Identity Module) and Radio Waves. The common radio frequencies in which a typical GSM Module operates are 850MHz, 900MHz, 1800MHz and 1900MHz. Since it is not possible to interface a GSM/GPRS Module directly to an external device like a microcontroller, we need a setup like shown in the following image.
It consists of the GSM/GPRS Module, slot for inserting a SIM Card, RS-232 Interface for connecting with computer or a microcontroller, signal status LED, power supply and a provision for connecting microphone and speaker. Each GSM/GPRS Module is unique and it can be differentiated by its IMEI Number. IMEI or International Mobile Equipment Identity Number is a 15 – digit unique number associated with mobile phone, satellite phones and other GSM Network devices. Read this interesting post: GSM Controlled Robot using Microcontroller With the help of this GSM/GPRS Module, we can do the following tasks.
Make, receive or reject voice calls Send, receive or delete SMS messages in the SIM Card Add, read and search the contacts in the SIM Card Send and receive data to / from the GSM/GPRS Network through GPRS
All the above mentioned tasks can be accomplished with the help of ATtention Commands or AT Commands. AT Commands are a part of Hayes Command Set, which are defined originally for a modem. GSM Network also implements a similar AT like commands for its GSM Modules. The processor or controller to which the GSM/GPRS Module is connected to, is responsible for sending the AT Commands to the module. In response, the GSM Module performs command specific tasks like answering a phone call, send an SMS Message, etc. Even through the AT Commands may seem generic, it is advisable to refer with the data provided by the manufacturer of the GSM Module for correct and complete list of AT Commands.
Syntax of AT Commands
Generally, AT Commands consists of three parts: the Prefix, the Body or Command and the Termination. The Prefix part of the command consists of either “AT” or “at”. The body or command is the actual command given to the GSM Module. The Termination character is by default Carriage Return
Types of AT Command Operations
Based on the operation performed by the AT Commands, they are again divided in to four types: Test Commands, Read Commands, Write Commands and Execution Commands. We will now see the definition and syntax of all these command types.
Test Commands: These commands are used to test whether the command exists (supported by the GSM GPRS Module) or not and also checks for the range of a command’s subparameters. When a Test Command is given to the GSM GPRS Module, it returns the list of all the parameters and also the range set of the parameters.
The syntax of a Test Command is ATCMD1=?
Information Responses and Final Codes
After sending the AT Commands to the GSM GPRS Module, we have look for the response. For example, if we send the command as AT+CGMI
Frequently used AT Commands
In this list, you can find out some of the most commonly used AT Commands. For a complete list of AT Commands and their definitions, it is advised to refer the manufacturer data. The
Δ


![]()