Measuring temperature is an important part of many applications. Maintaining precise temperatures in storage rooms, laboratories, incubators, etc. is of high priority. For all the above mentioned and many more applications, thermometers are often used to measure the temperature. There are different types of thermometers available for different purposes. The most commonly found thermometer is a medical or clinical thermometer, which is a mercury in glass type thermometer. They are used to measure the temperature of human body and is an example of an analogue thermometer. Now a days, the use of digital thermometers is increasing as they are accurate and safe to use. In this project, an Arduino based digital thermometer is designed that can be used to monitor the temperature of room.
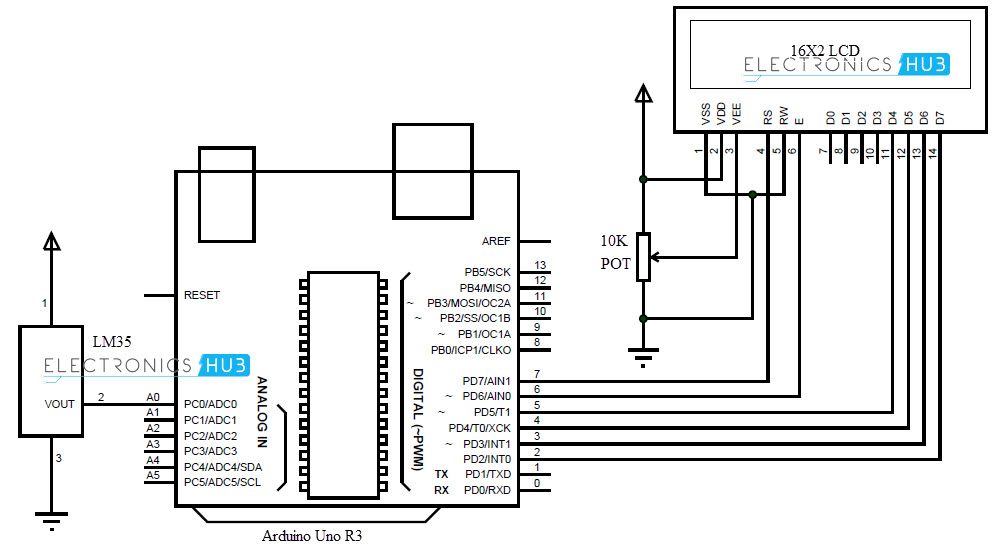
Circuit Diagram
Hardware Required
Arduino Uno [Buy Here] LM35 Temperature Sensor 16X2 LCD Display [Buy Here]
Component Description
LM35
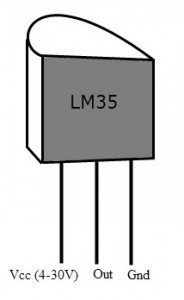
LM35 is a precision centigrade temperature sensor. The output voltage of the sensor is directly proportional to the temperature in centigrade. LM35 can be used in the range of -550C to +1500C with +/- 0.750C accuracy. At room temperature, the accuracy is +/- 0.250C. The output voltage of LM35 changes at 10 mV /0C i.e. for every 10C change in temperature, the output voltage changes at +/- 10 mV. LM35 is a 3 pin IC and the figure depicting the pins is shown below.
A similar precision temperature sensor is LM34 that can be used to measure temperature in Fahrenheit. It can be used to get the temperature directly in Fahrenheit.
Circuit Design of Digital Thermometer
LM35 is the temperature sensor used in this project. The output of the sensor is directly proportional to the temperature but in analogue form. Hence, the output of LM35 i.e. pin 2 is connected to analog input A0 of Arduino. As it is a digital thermometer, we need to convert the analogue values to digital and display the result on a display like LCD. We used a 16X2 LCD in this project. Pins 1 and 2 of LCD are connected to ground and supply respectively. In order to control the contrast of the display, Pin 3 of LCD is connected to the wiper of a 10 KΩ POT. The other terminals of POT are connected to supply and ground. Pins 15 and 16 of LCD are used to turn the backlight of the LCD. They are connected to supply and ground respectively. In order to display the information on LCD, we need 4 data pins of the LCD. Pins 11 – 14 (D4 – D7) are connected to Pins 5 – 2 of Arduino. Pins 4, 5 and 6 (RS, RW and E) of LCD are control pins. Pins 4 (RS) of LCD is connected to pin 7 of Arduino. Pin 5 (RW) is connected to ground. Pin 6 (E) is connected to pin 6 of Arduino.
Working
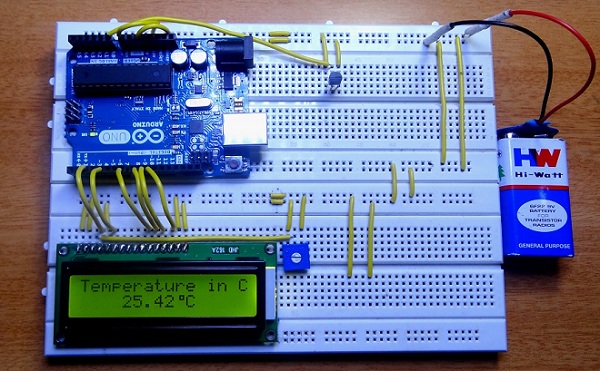
A high precision digital thermometer is designed in this project. It is constructed with simple components like Arduino, LM35 temperature sensor and an LCD display. The working of the circuit is very simple and is explained below. The temperature sensor i.e. LM35 continuously monitors the room temperature and gives an analogue equivalent voltage which is directly proportional to the temperature. This analogue data is given to Arduino through A0. As per the code written, the Arduino converts this analogue voltage value to digital temperature readings. This value is displayed on the LCD. The rate of change of temperature capture can be programmed in the code. The output displayed on the LCD is an accurate reading of room temperature in centigrade.
Code
Note
This project can be used to monitor temperature of a room with in a range of -550C to +1500C with very accurate readings. The temperature sensor used (LM35) is a precision centigrade temperature sensor. If the readings of the temperature are required in Fahrenheit, then either Fahrenheit temperature sensor (LM34) can be used or simply modify the code for converting Centigrade to Fahrenheit. The thermometer can be powered by a 9V battery making it a portable device that can be easily moved between different rooms or locations. Can be used in transportation vehicles to determine the icing conditions of the road. Based on the readings of the thermometer, the air conditioning systems, heating and cooling systems can be controlled either manually or automatically.
When can we expect the code uploaded? Is there any code possible to run both the HeartBeat Sensing and the Digital Thermometer in a single application? Comment * Name * Email * Website
Δ
![]()
![]()
![]()
![]()
![]()

